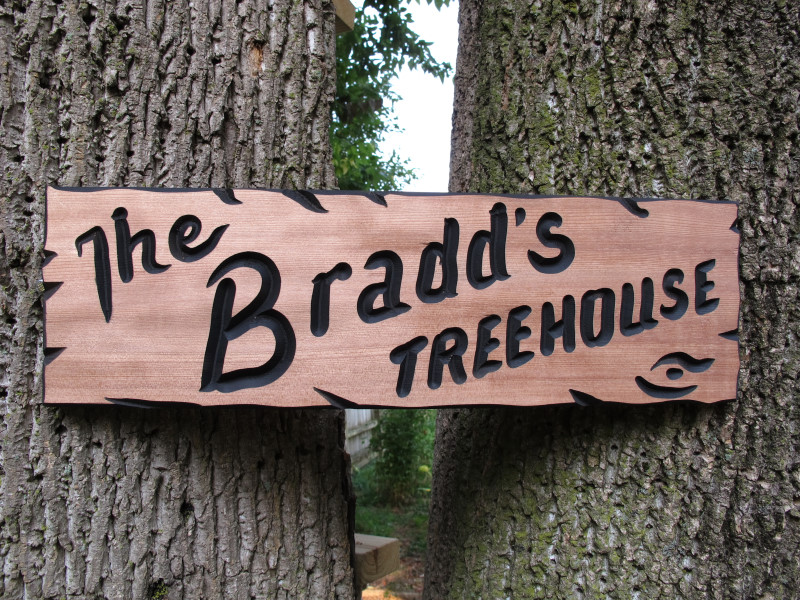
JUNE 2009
Adin (7) & Abel (5) express a desire to build a treehouse in the backyard. Daddy does some research and initial planning.
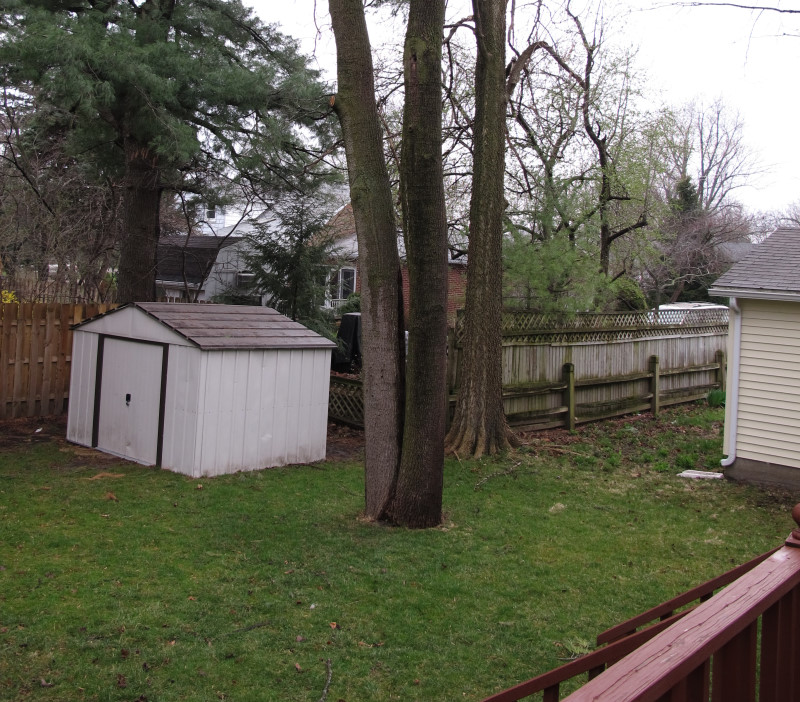
A tree is selected (which wasn't too hard since there is only one suitable for this purpose on our property!).
The boys start saving with a goal of $300. This will be their financial contribution to the project.
JANUARY 2011
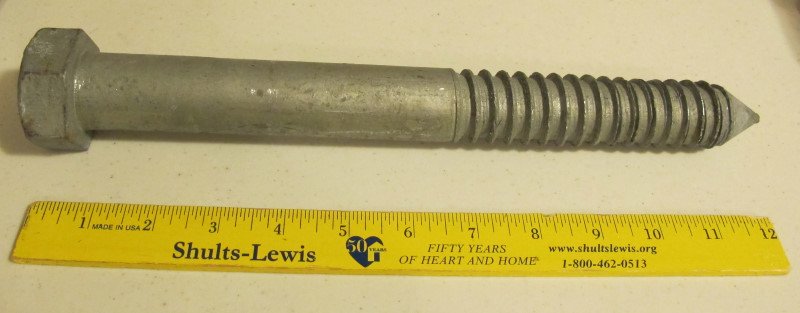
$300 goal reached! Daddy buys 5 lag bolts from a professional tree house builder for $219.75
(the initial plan was to only spend about half this much on smaller bolts, but there was some concern about structural safety).
4 of these bolts will bear almost all the weight of the entire treehouse
(the remaining bolt will be a floor anchor, used more for stability than weight bearing purposes).
These bolts are 12" long and weight over 4 pounds a piece! They are 1.25" in diameter.
MARCH 2011
With Spring arriving, it's time to get busy!
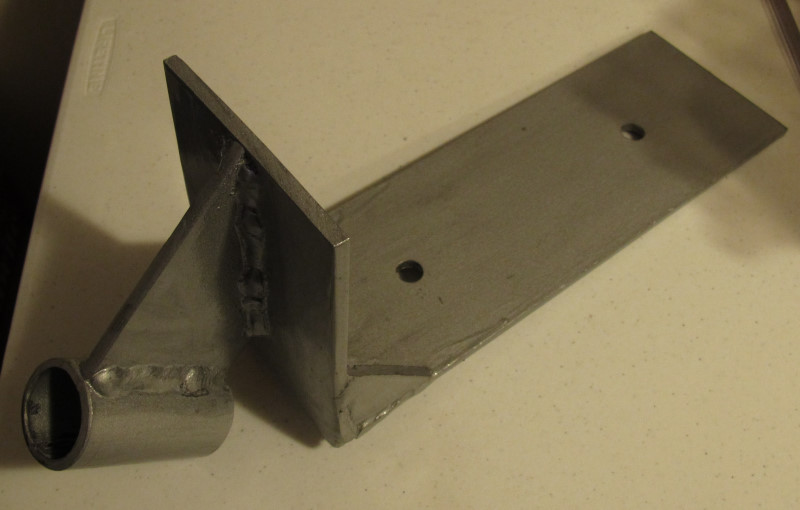
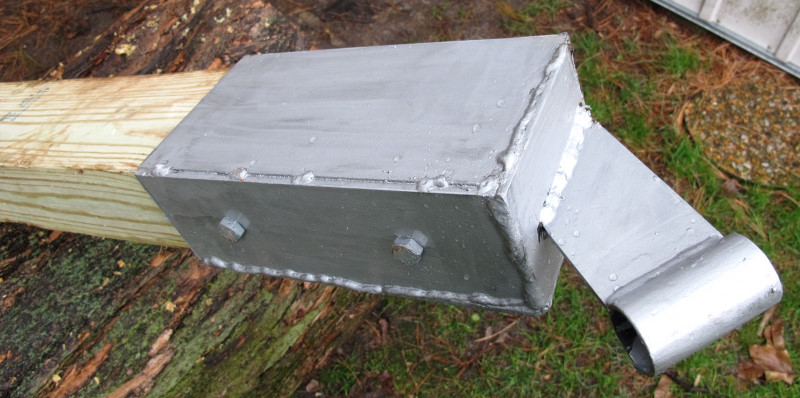
Grandpa Bradd is asked to weld and paint 5 special steel mounting brackets to be used with the lag bolts
(the professional tree house builder sold these for a total of over $400). Grandpa's bill was under $100!
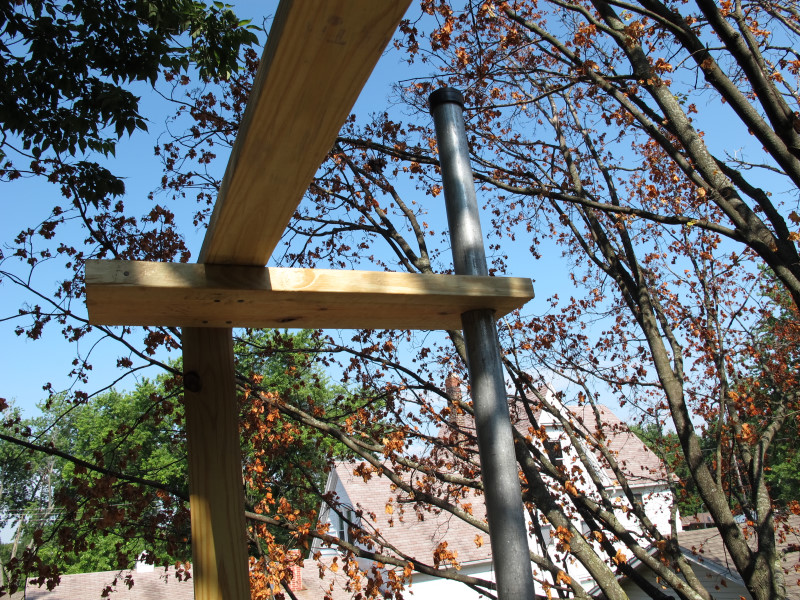
The 4 weight-bearing lag bolts will be slid through the main brackets and drilled into the tree about 7".
These brackets will then each receive 4" x 6" beams (8' long) that will go up at approximately 45 degree angles to provide support for
what will eventually be the 4 corners of the treehouse floor. The treehouse floor will be approximately 10' x 12' (elevated about 13' above the ground).
Even with the tree coming up through the middle of the house, there should still be over 100 sq. ft. of floor space.
APRIL 2011
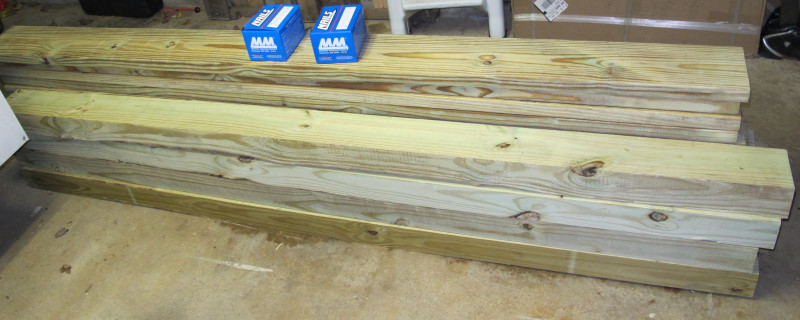
The 4" x 6" beams are purchased at Menards along with all the joists for the subfloor and also the nails ($141.17).
It is time to begin installing the bolts and brackets (which will be the most critical part of the whole process).
Any minor mistakes on this part of the project will lead to serious challenges up above
(or, at the very least, a lot of extra work up above to make everything come together properly).
12 sets of 7" long galvanized hex bolts (with washers & nuts) are special ordered for $31.59.
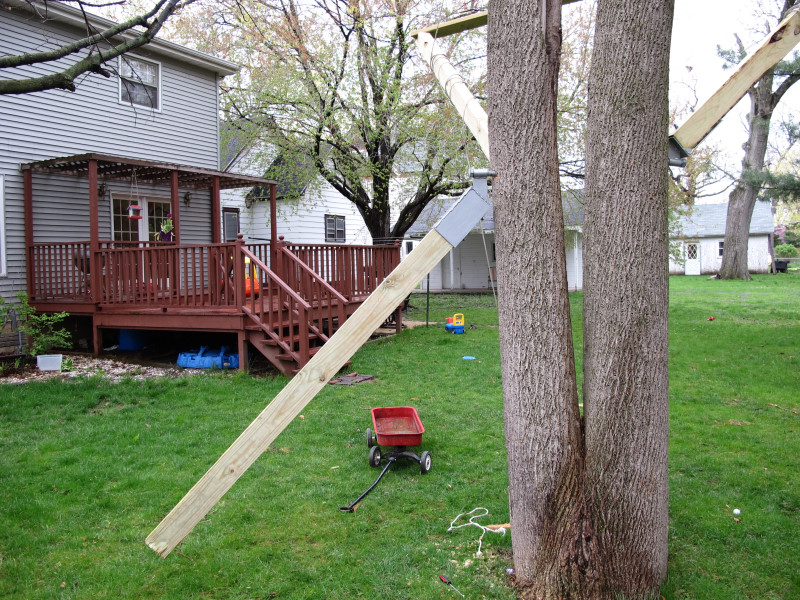
As of 04/04/11, two lag bolts have now been mounted 7" deep and approximately 7 feet off the ground.

A picture from 04/11/11. The two beams are held in place temporarily by steel cables that have been wrapped around the tree about 20' up.
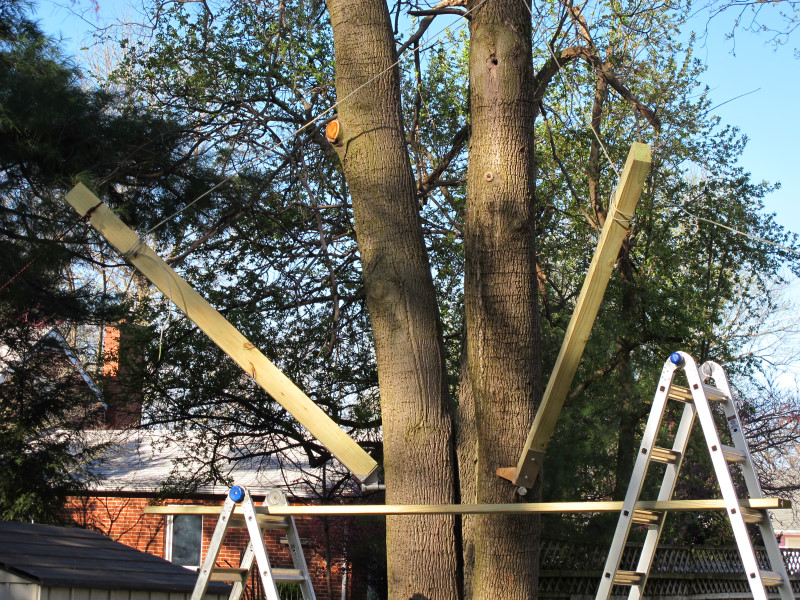
On 04/12/11, the two beams were leveled and cut to enable us to nail a 2" x 8" board (12' long) between them.
A total of fourteen 4" long nails were used to attach this board. The safety cables were removed but then reinstalled (to minimize stress on the steel plates).
Although Grandpa welded steel brackets per Daddy's design, Daddy can see that his design could have been better.
Adjustments will be made on the last two brackets to make them stronger (which are yet to be made).
Additionally, some sort of permanent cable enforcement will be necessary for extra strength.
Progress is slow with lots of rain and other important matters to attend (e.g., a homeschool convention, baseball practice, area gospel meeting).
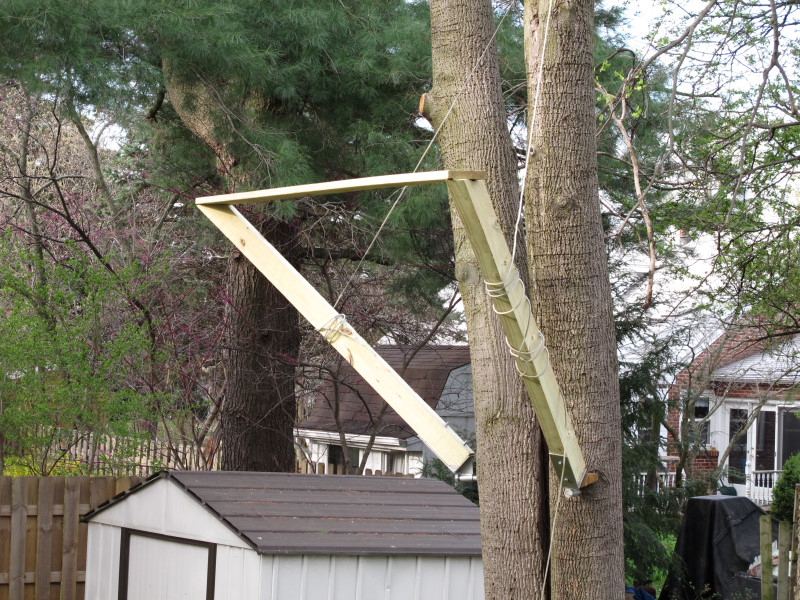
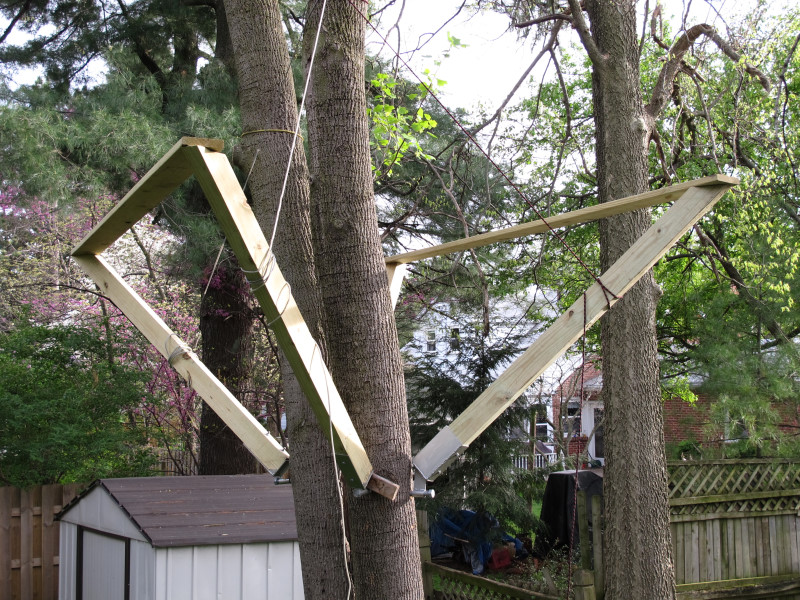
Grandpa has finished brackets #3 and #4. Instead of an "L" shaped platform for the main support beams to rest on, we now have a steel "sleeve" that is much stronger.
Due to an unexpected challenge (namely the sleeves being a little tight) we only were able to mount bracket #3 on 04/21/11.
#4 is ready to be mounted next time.
Bracket #4 was mounted 04/28/11. The final two main beams were lifted and leveled on 04/29/11.
There is one more bracket to mount at floor level for overall stability.
MAY 2011
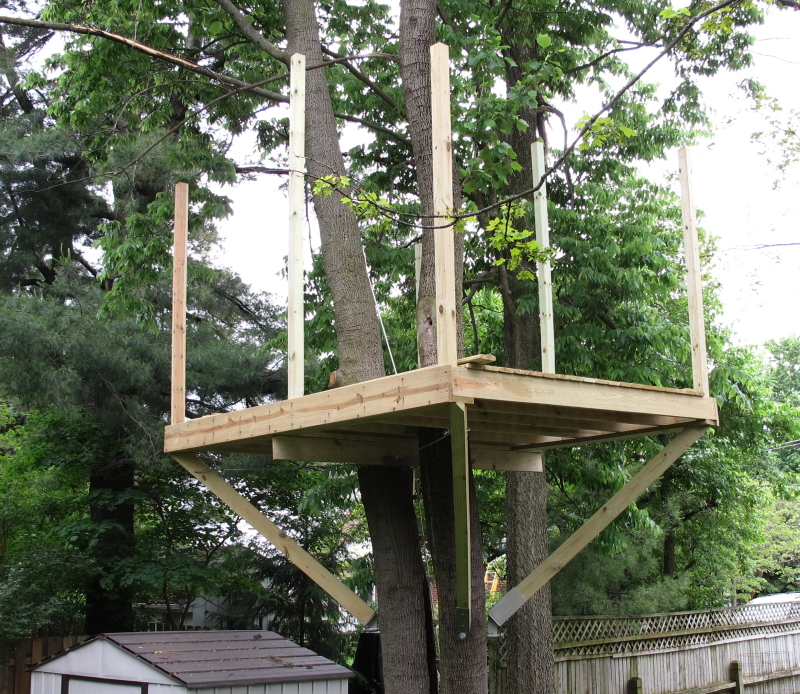
Most of the floor joists were put in place and bracket #5 was mounted on 05/05/11 and 05/06/11.
This floor-level bracket provides extra stability and helps bear the weight in the middle of the tree.
Four safety cables still need to be permanently installed before the floor is laid.
Cost up to this point is $565.
Daddy will stop by Menards after the preachers' meeting Monday and buy a bunch more supplies!
The boys are getting more excited as they are starting to see the project coming together.
Plans are being made for a climbing rope entrance, a 20' long fireman pole, a bucket & pulley system, and some other things.
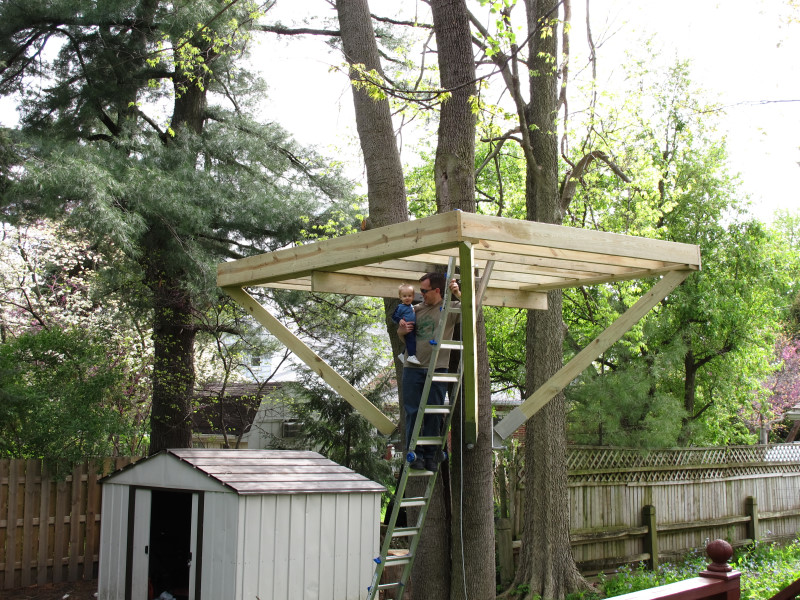
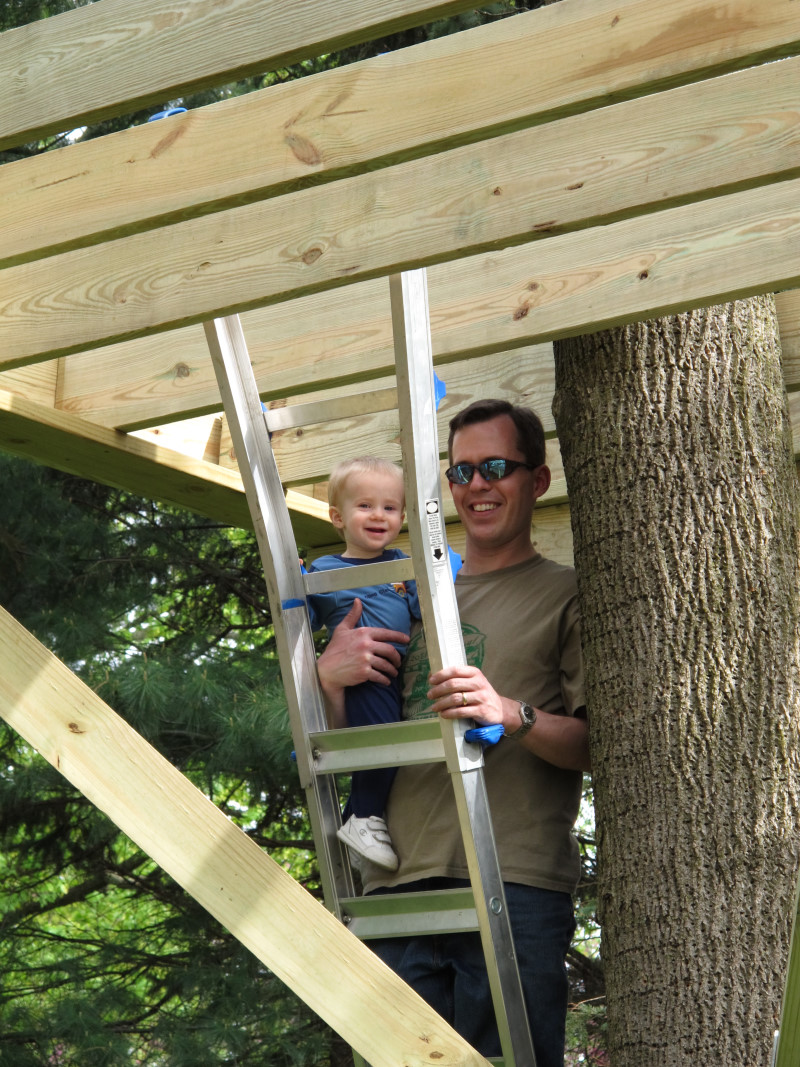
Daddy & Amos posing for pictures.
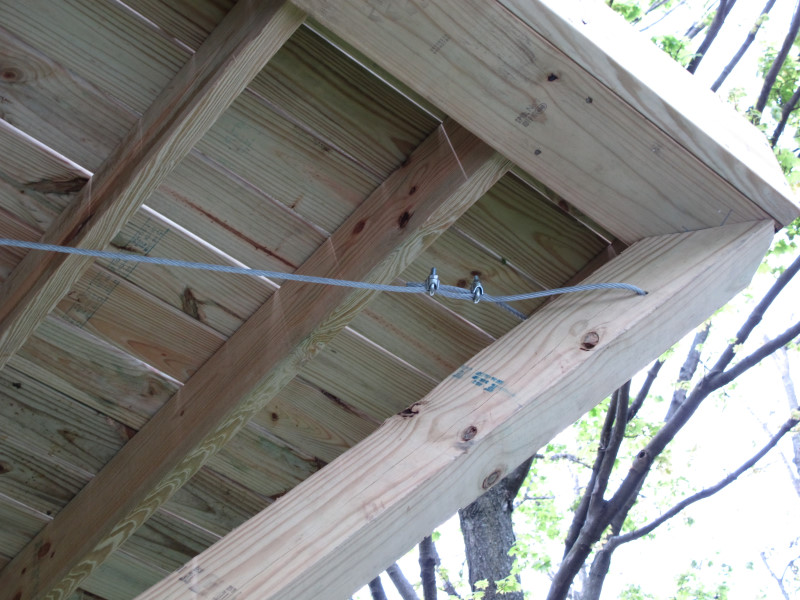
Grandpa helped Daddy attach the safety steel cables on 05/10/11.
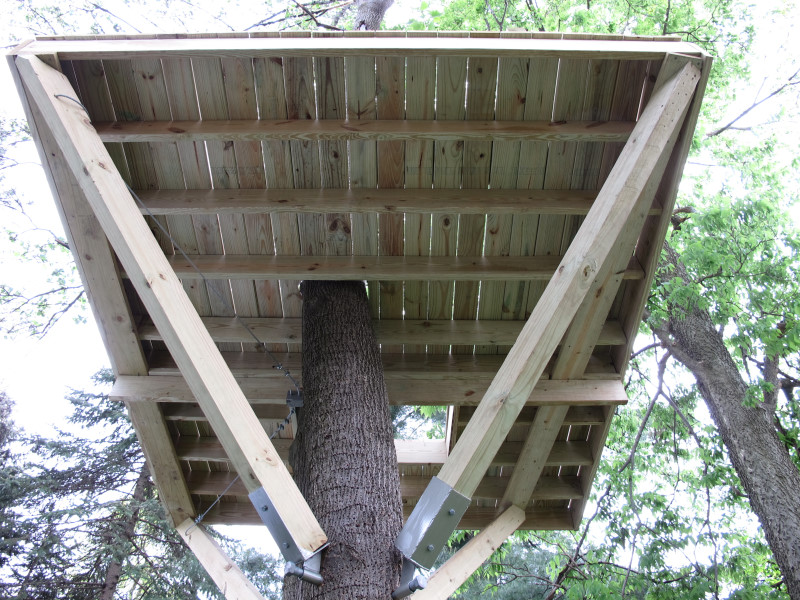
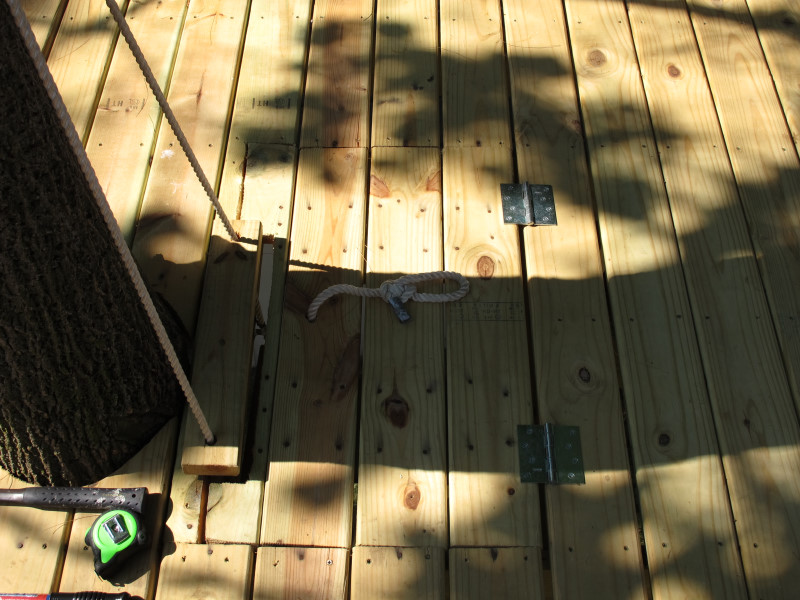
Daddy laid the treehouse floor on 05/12/11 and 05/13/11. The boards are tacked in place presently.
I forgot to buy screws to attach them permanently! Next time I'm in Decatur I will correct that.
There are several pics below that show certain angles of the progress.
Looking up at the floor bracket complete with steel cables for extra support.
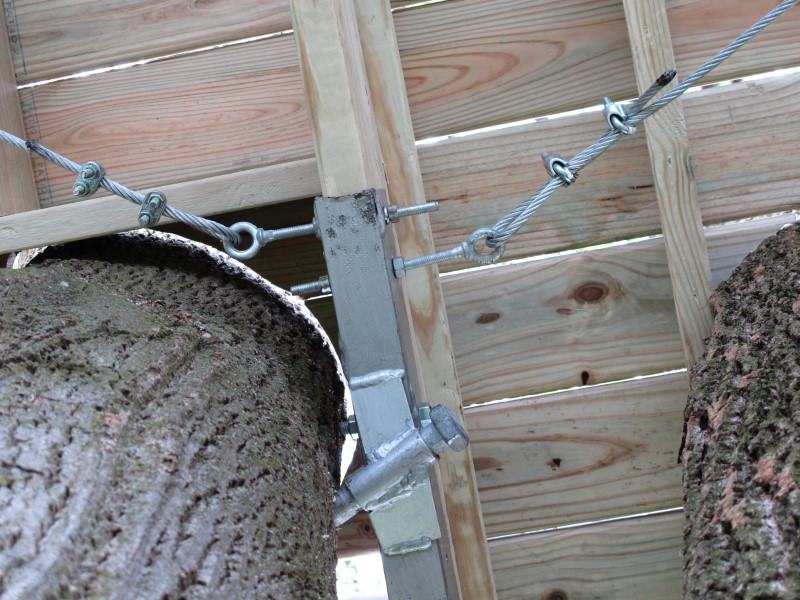
The cables were fed through the main beams.
A shot taken while sitting on the ground and looking up.
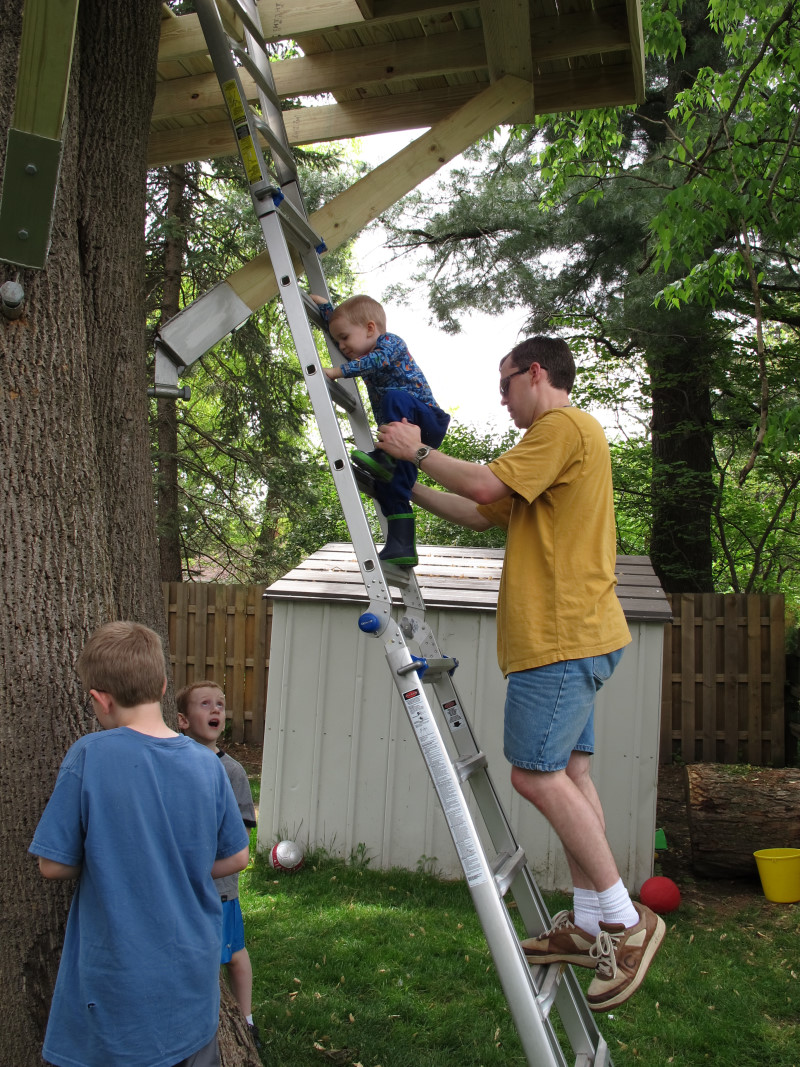
Abram & Daddy making the first semi-official ascent. Abel looks on in awe!
On top of the world with Daddy!
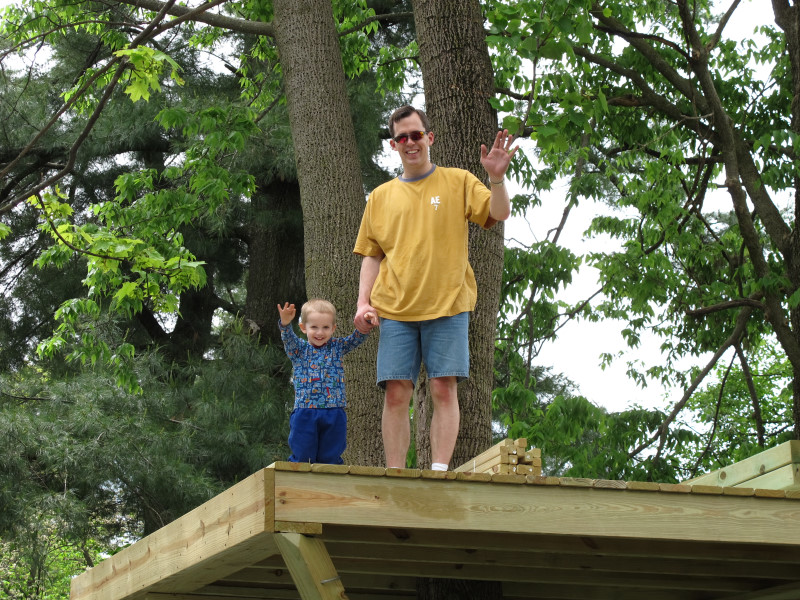
Another shot from the deck which gives a little perspective to the size & height of the project.
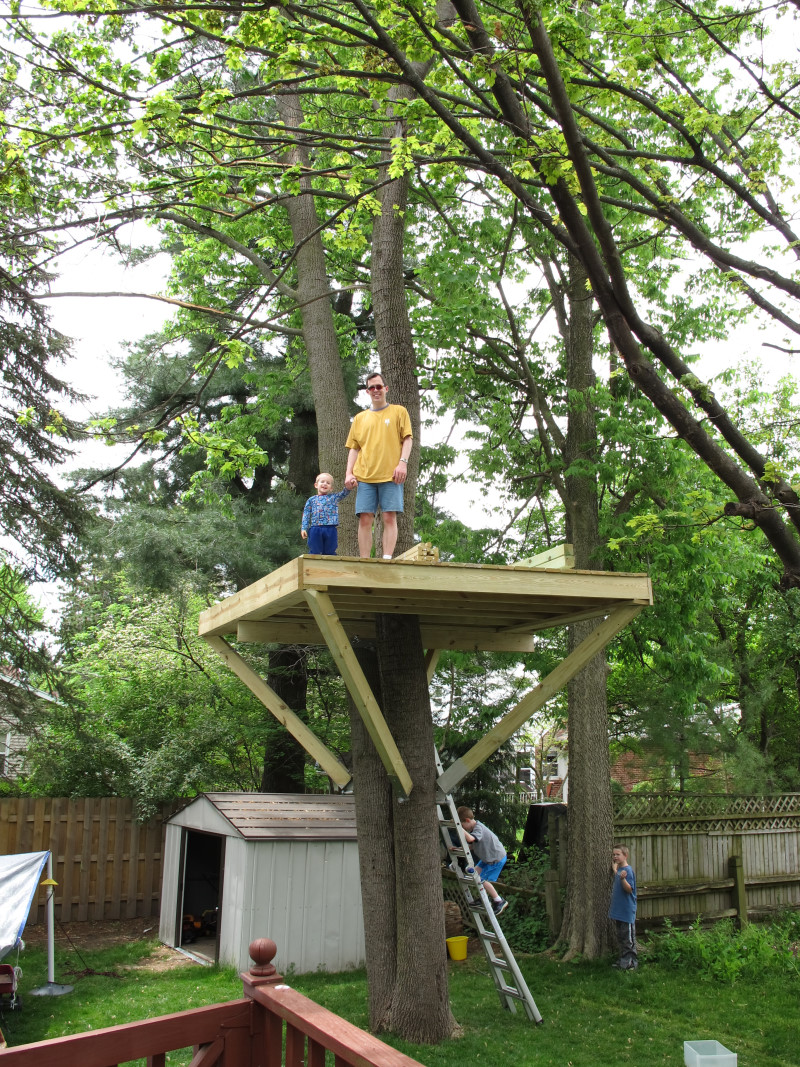
Abram (who will turn 3 on May 29, 2011) was the only son to climb up on the platform with Daddy.
Adin & Abel climbed half way up the ladder and lost their nerve!
I'm assuming they'll get more confidence as they see Abram playing up there by himself (once the railing is installed).
Otherwise, I guess Abram will have a big tree house all to himself (and subsidized by his big brothers)!
After taking the pics, I went in to eat lunch and happened to leave the ladder set up. That was a mistake!
I looked out the window to see Abram walking around on the treehouse floor. Thankfully, I got out there before anything disastrous happened!
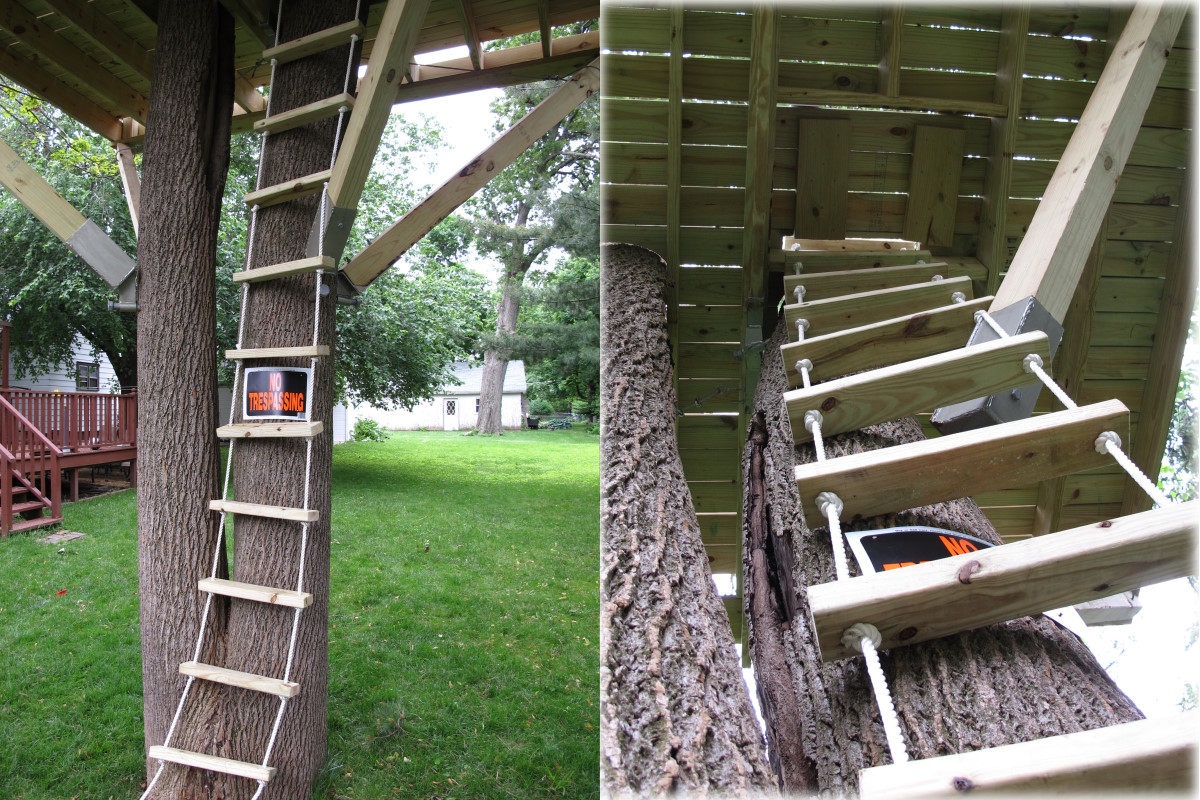
Daddy made & installed a rope ladder last week and finished the trap door on 05/27/11. He also put up the 6 main roof supports.
For liability reasons, we hung a "No Trespassing" sign near the bottom of the rope ladder.
Abel has been up in the treehouse with Daddy several times now. Adin still hasn't mustered enough courage to climb more than half way up the ladder.
JUNE 2011
Much to the dismay of the boys, very little got accomplished this month in the tree.
The roof on our home was in need of being replaced so Daddy took a week of vacation to do all the tear off and putting down of synthetic felt.
Then he spent his free time for the rest of the month and even into July laying shingles. Whew! Glad that is finished so we can get back to the fun outdoor project! :)
JULY 2011
Although not a lot has changed visually, quite a bit was accomplished this past week.
All of the floor boards that were simply tacked down on the ends have been secured with screws at every joist.
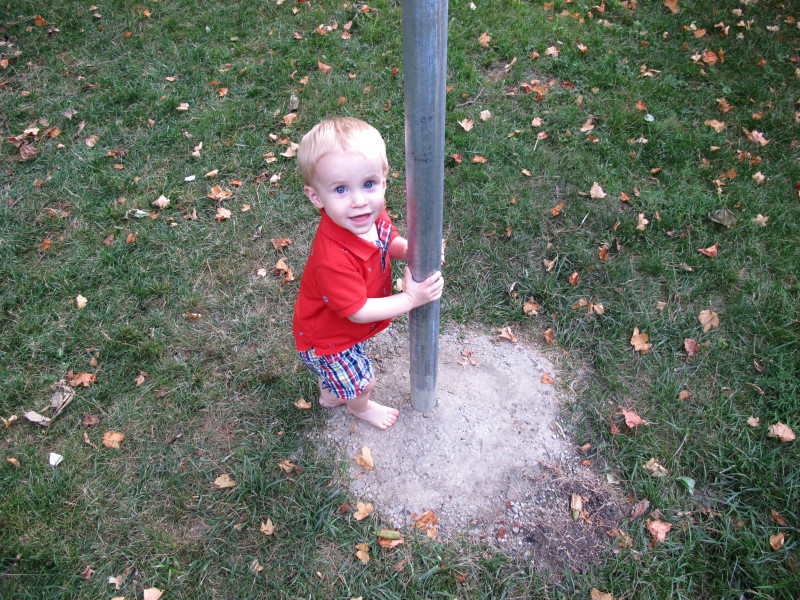
The fireman pole was set in 2' of concrete (it still needs to be secured up top). Here's a shot of Amos at the base of the pole.
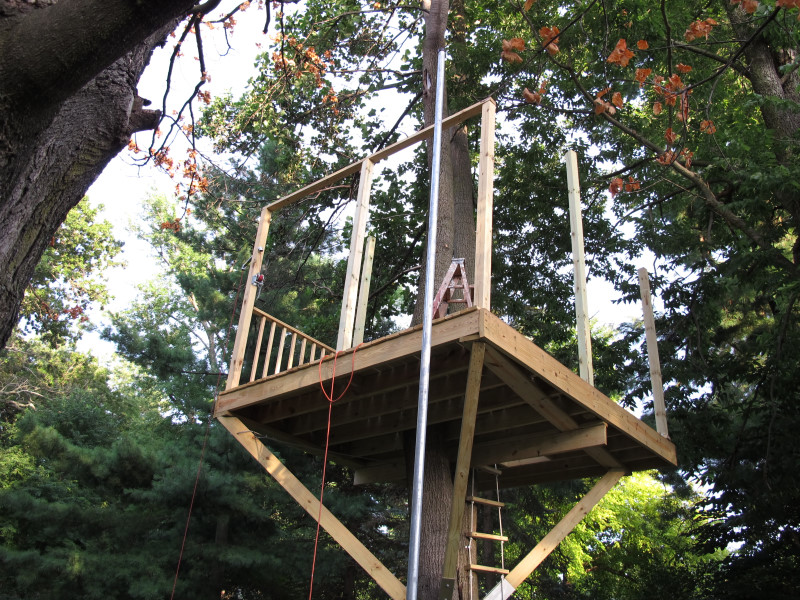
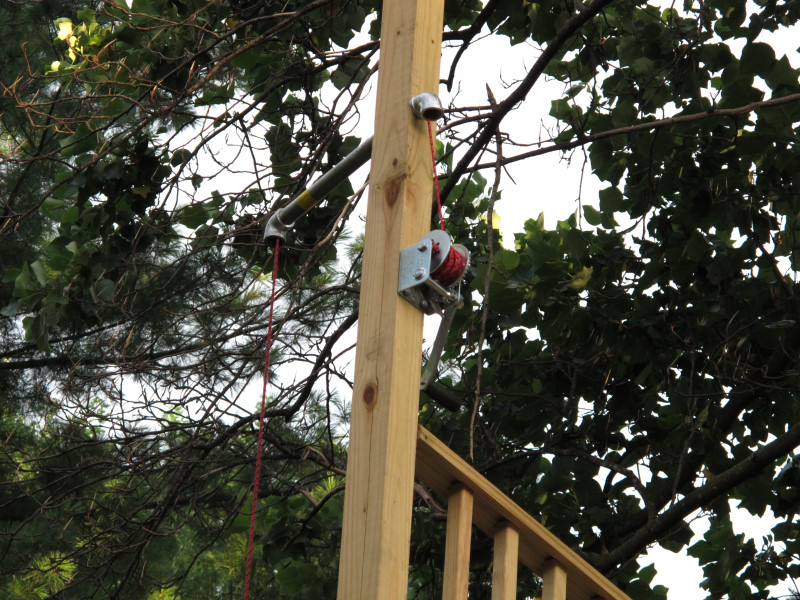
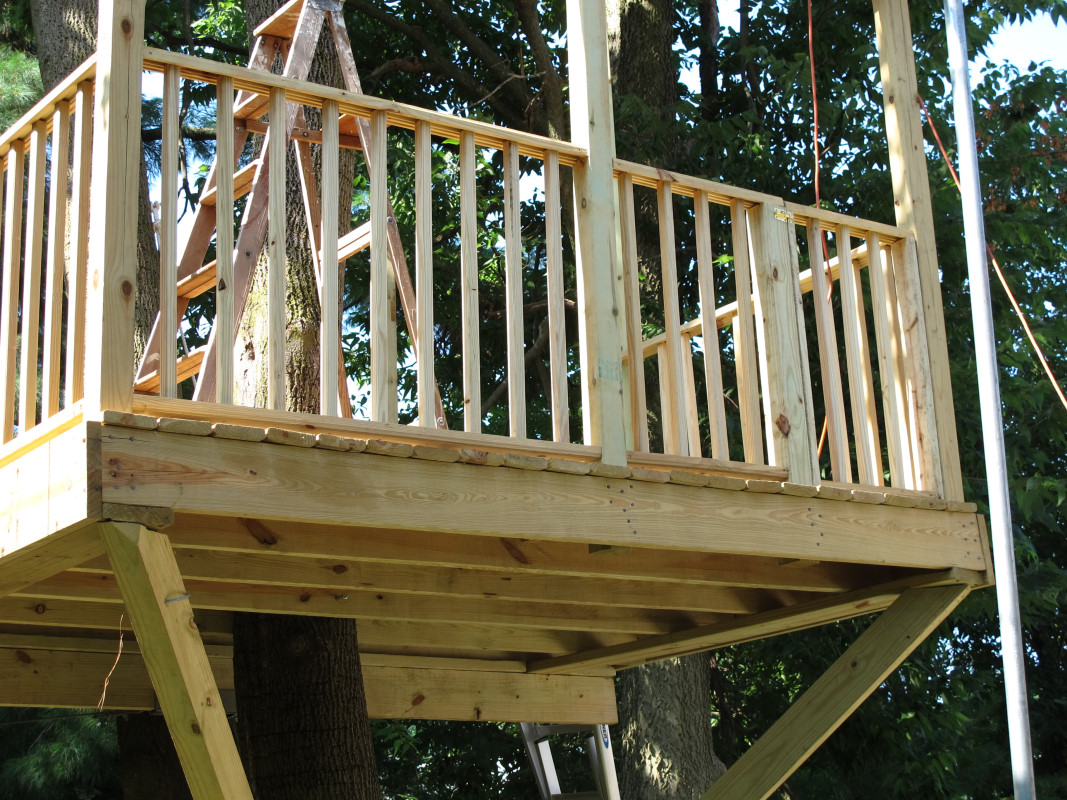
Daddy installed one of the 4 sections of railing as well as the winch and bucket system he had envisioned.
The winch is mounted to a wall post and routed through the post and a pipe in order to prevent the bucket from hitting the bottom of the treehouse as it is being cranked up.
Although it takes a lot of cranking to get the bucket up, it is not difficult.
This addition will serve as an easy means to bring up tools now and I'm sure it will be used to haul up water guns, snacks, books, etc. once the treehouse is completed.
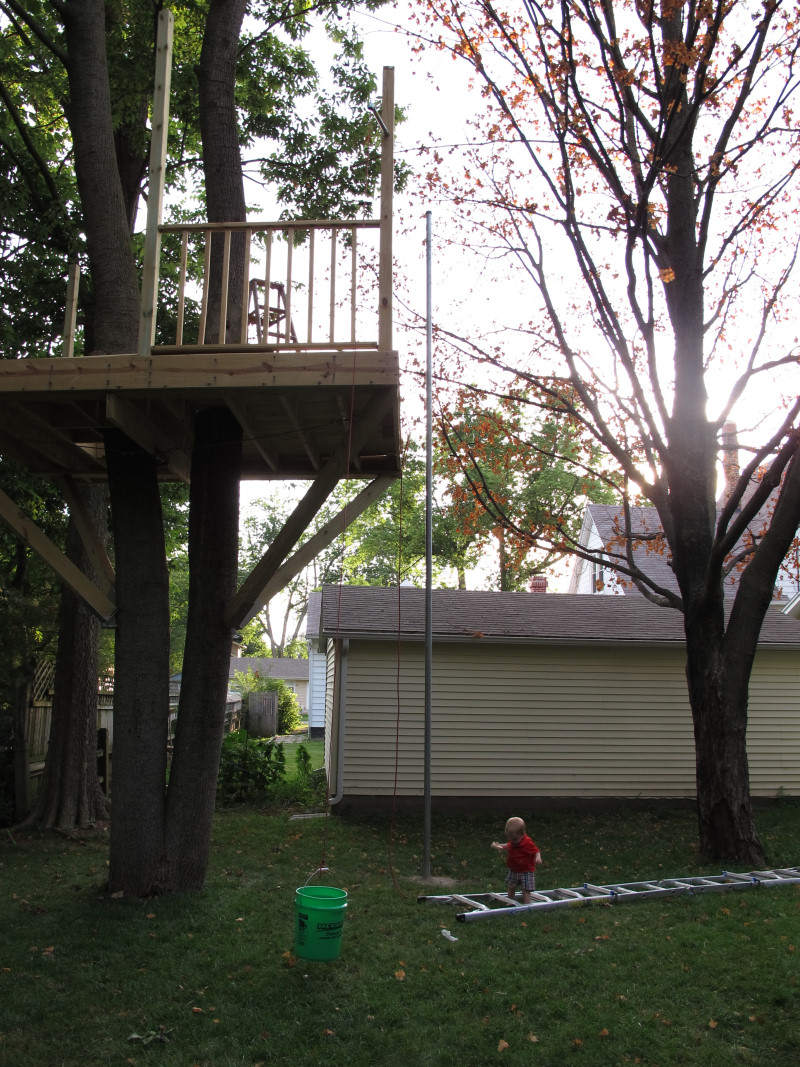
I had to put the ladder on the ground so that Amos (15 months old) would stop trying to climb it!
He got to the 3rd rung twice before I pulled him off.
Here is a view of the trapdoor (both closed and then open). It has a rope handle for easy opening and closing.
It is very strong and can be walked on with no problems.

Here is a shot of the top of the fireman's pole. It is now attached and capped.
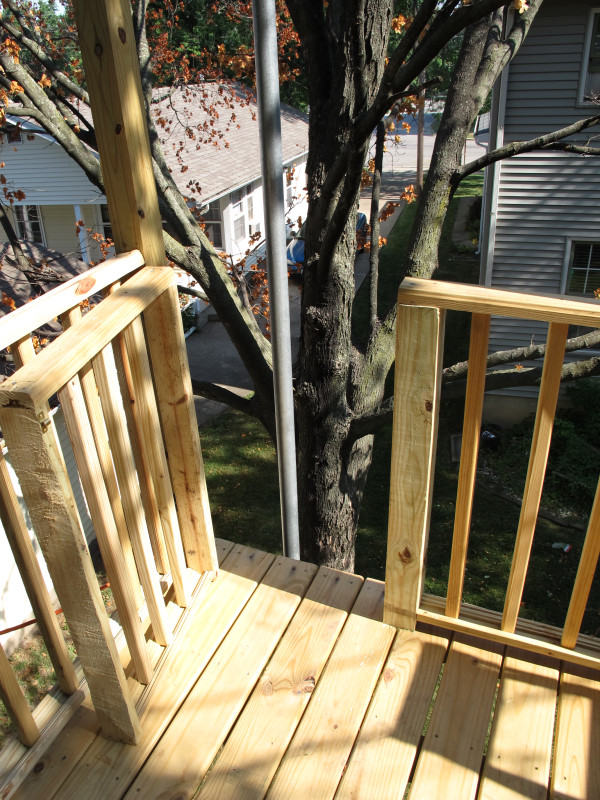
I completed the railing section on 07/21/11. Here is a shot from our deck.
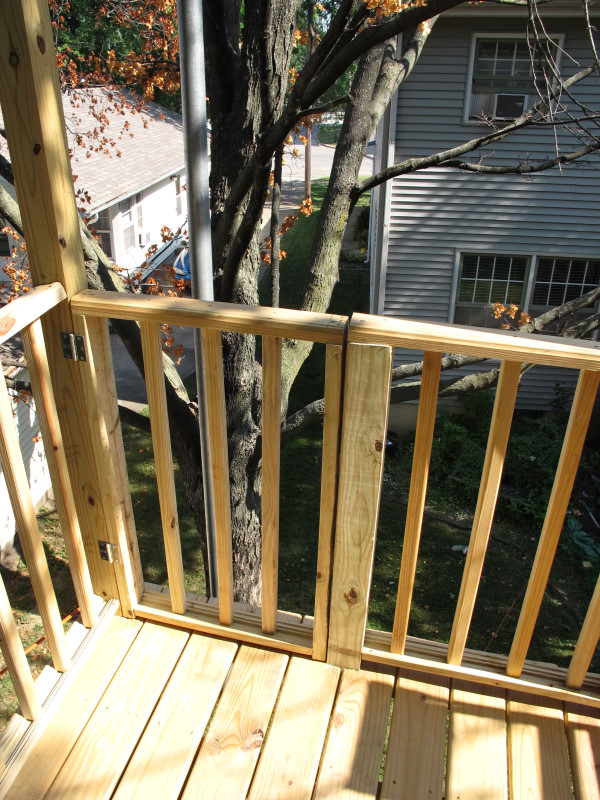
The following 2 shots are from in the treehouse. You can see the section of railing that has a gate for access to the pole.
I installed a latch on the outside of the gate so only the big kids can open the gate.
I've been down the pole (and up it) several times. I need to do a little wet-sanding on it to make it smoother, but it works now.
Abel went down it once already (very slowly). He'll be flying down it by the end of the summer!
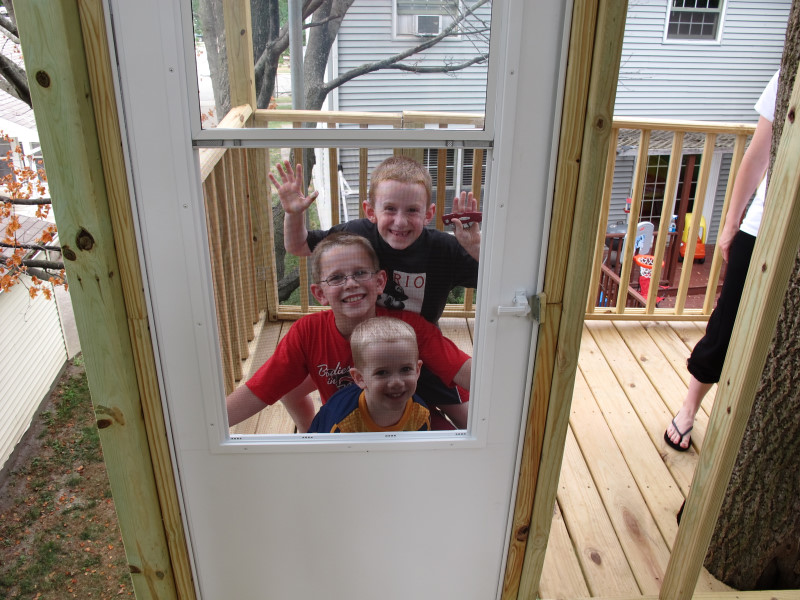
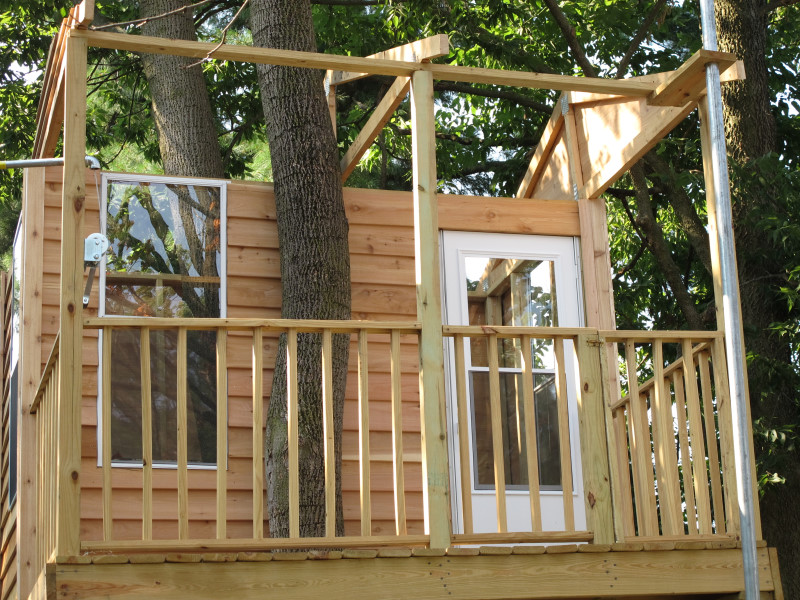
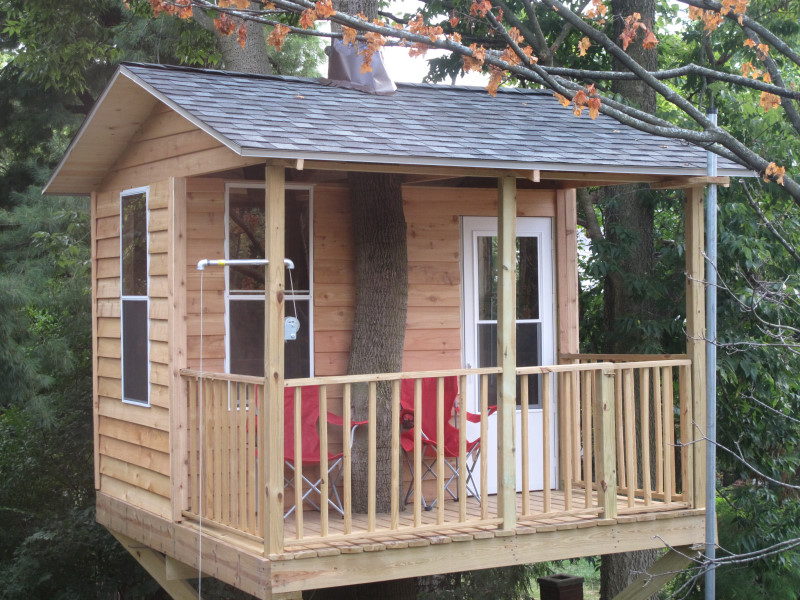
With the railing sections complete, the next step is to put up the walls, install 3 screen windows, and 1 screen door.
All of these items have now been purchased, along with cedar beveled siding, trusses, and carsiding (tongue & groove) boards for the roof.
We've ended up spending a lot more than I had initially planned, but we're having great fun building and will hopefully get years of use from
the completed treehouse!
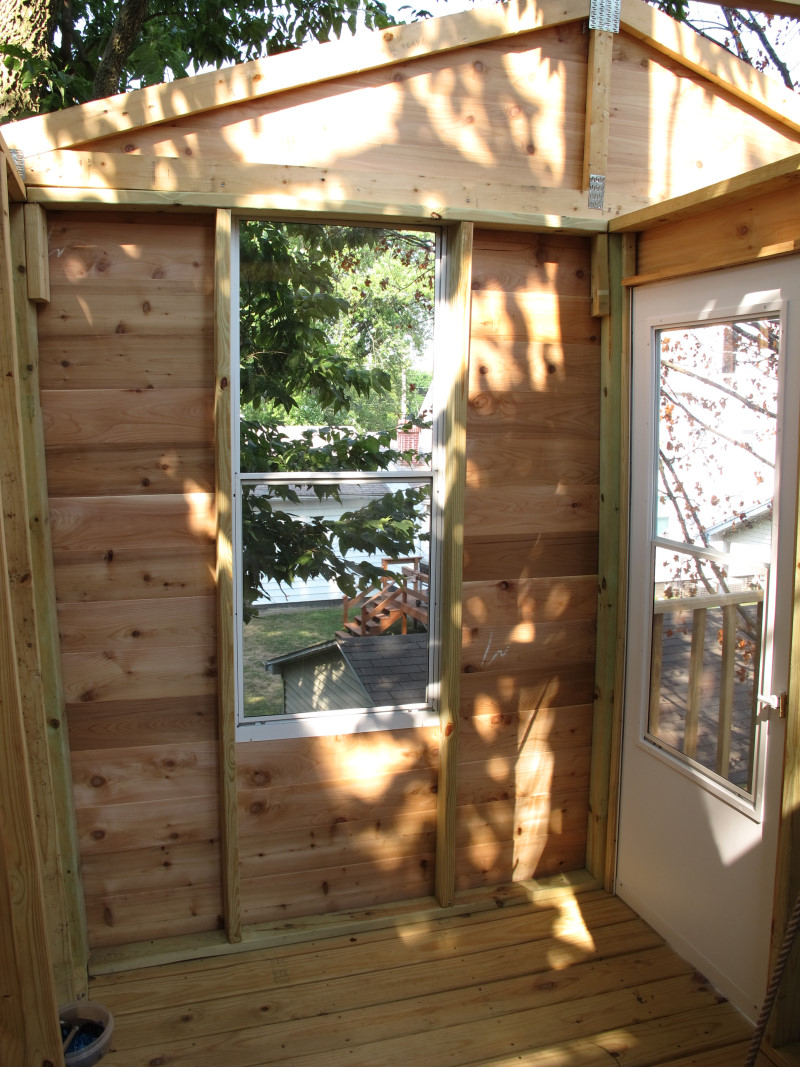
Daddy spent a couple hours on 07/23/11 framing the south and east walls. He also installed 1 window.
AUGUST 2011
We got back from a week of church camp at the end of July and are busy working again up in the tree!
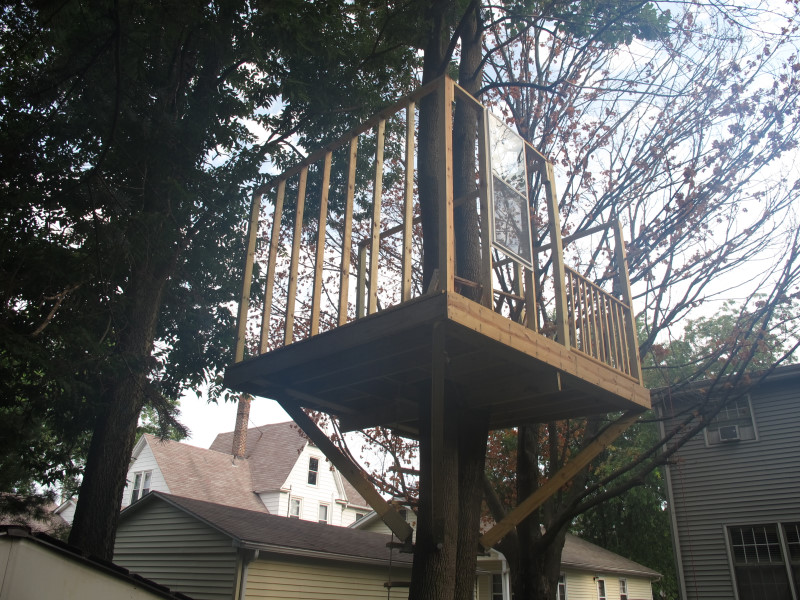
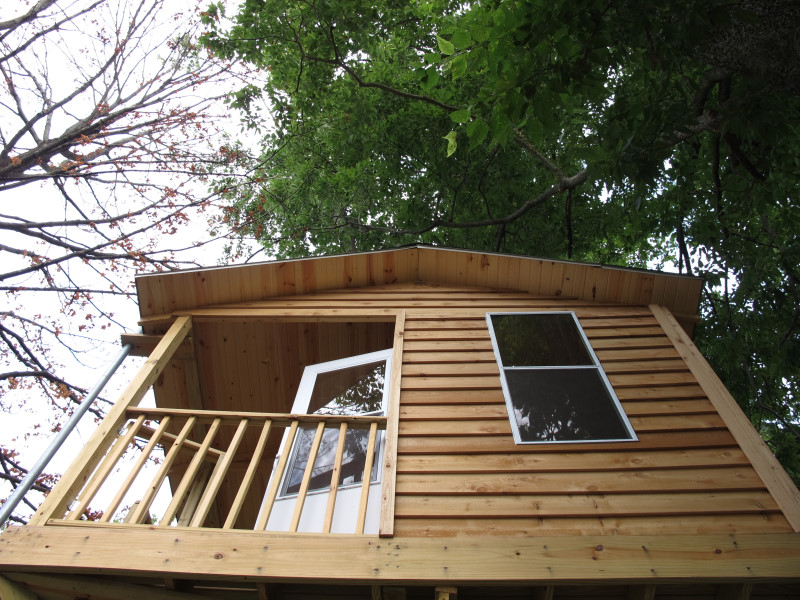
Daddy got the trusses in place and finished framing the walls on 08/05/11.
It's starting to look more like a house now, and less like a deck in the sky!
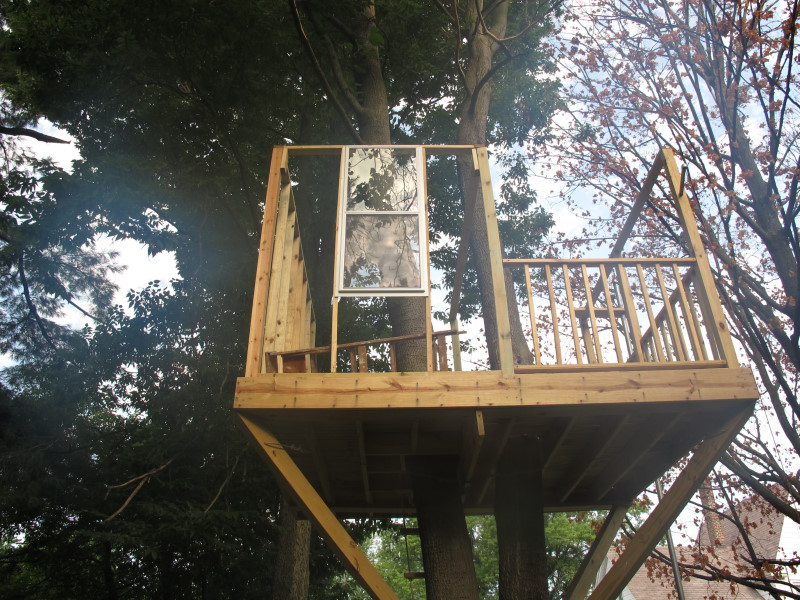
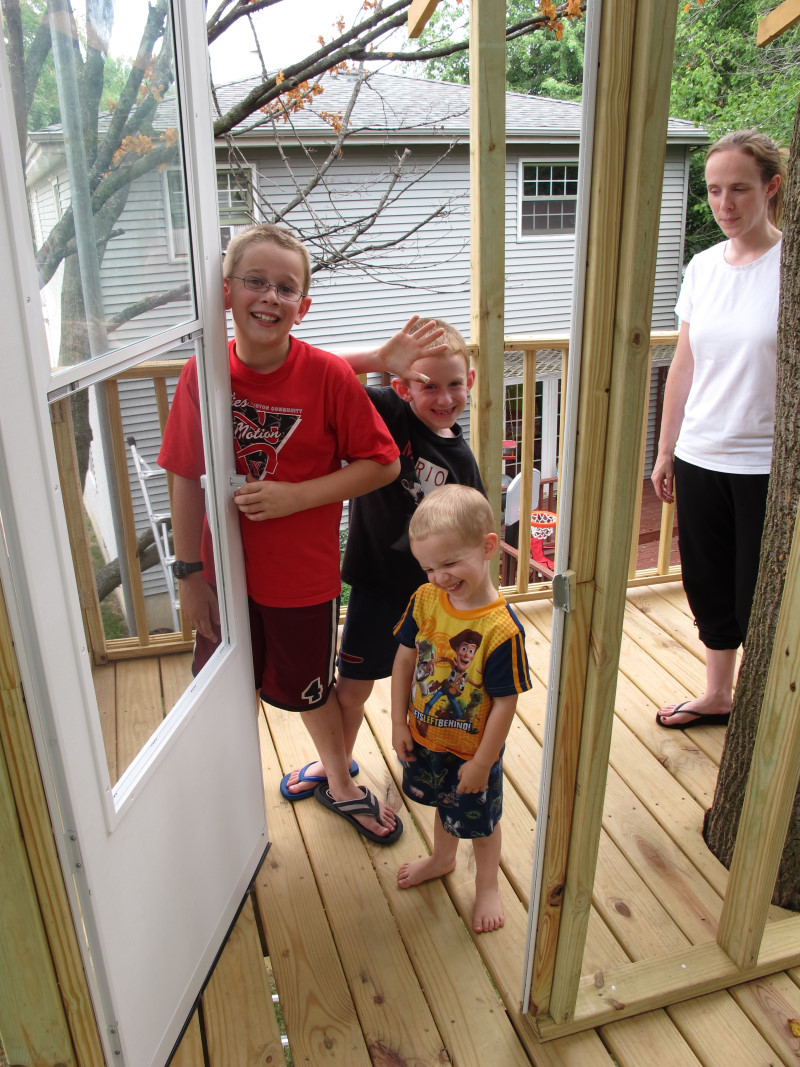
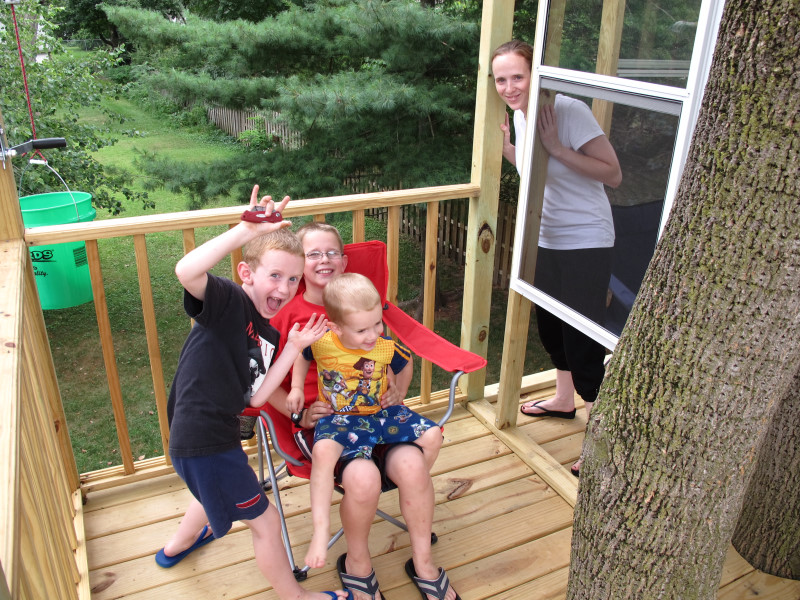
Here is a shot of Adin, Abel, & Ranae. They are standing in the "open half" of the treehouse.
When the project is completed, the other half will be completely enclosed.
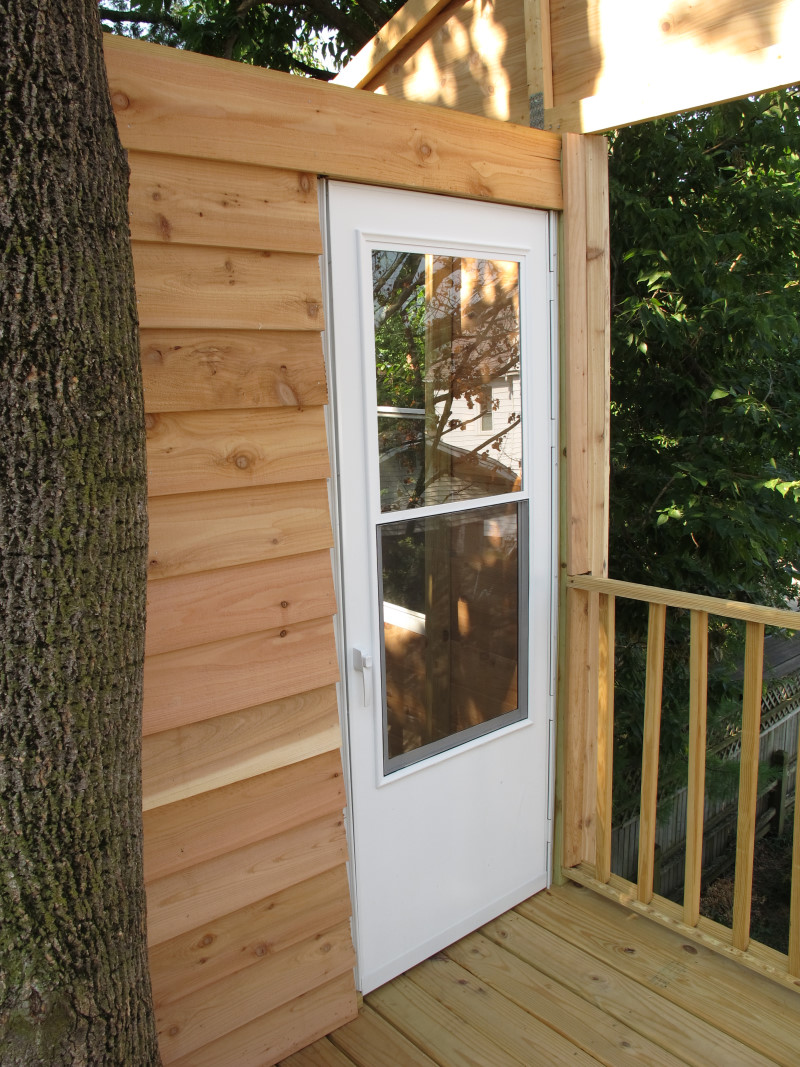
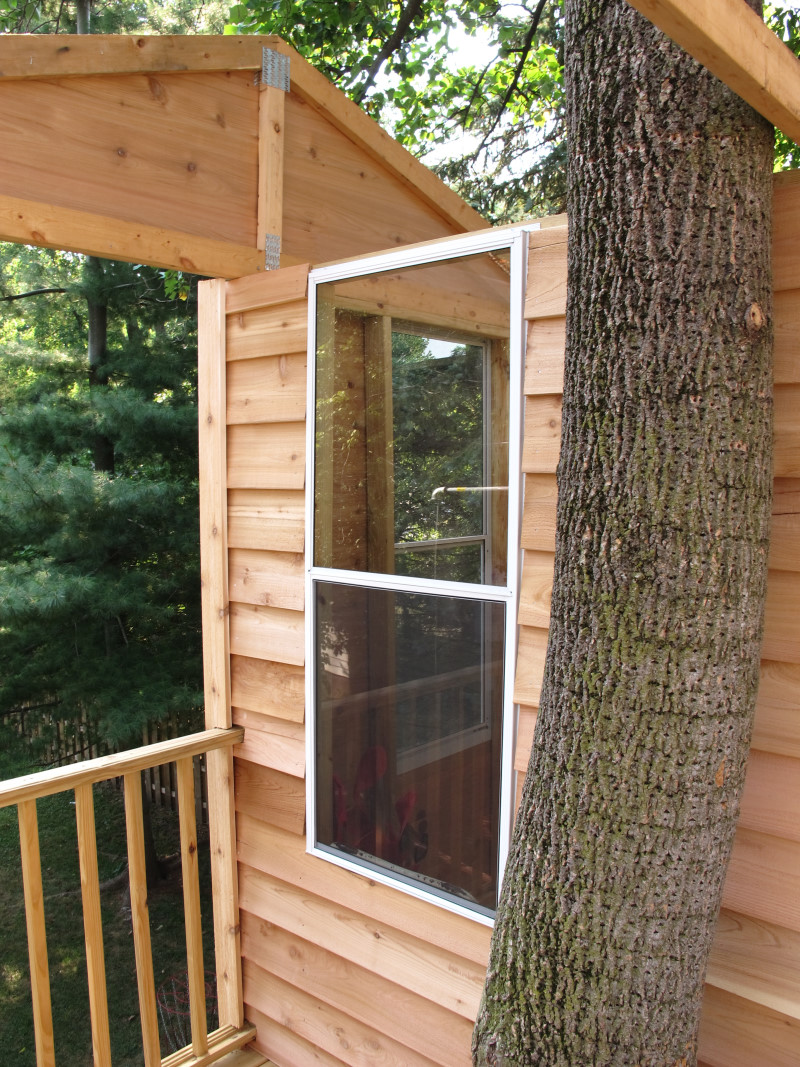
The enclosed portion has 3 screen windows & 1 screen door, and they have all been installed now.
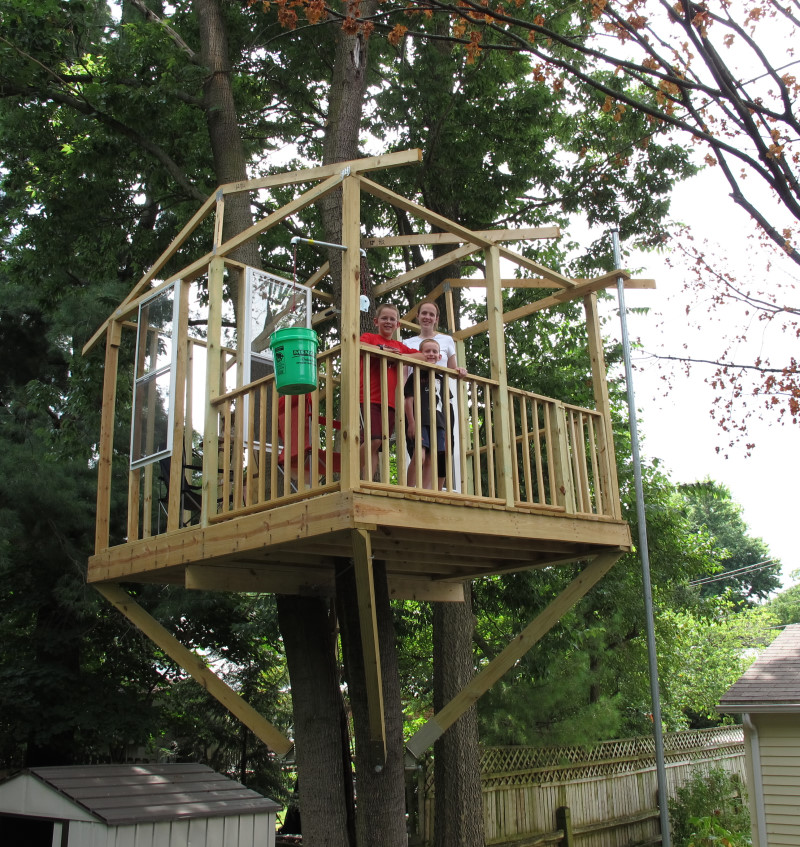
Can you tell they're getting excited about the project getting near to the end? :)
Abram is laughing himself silly!
It's hard to see from this pic, but Ranae is peeking out of the half of the treehouse that will soon be enclosed.
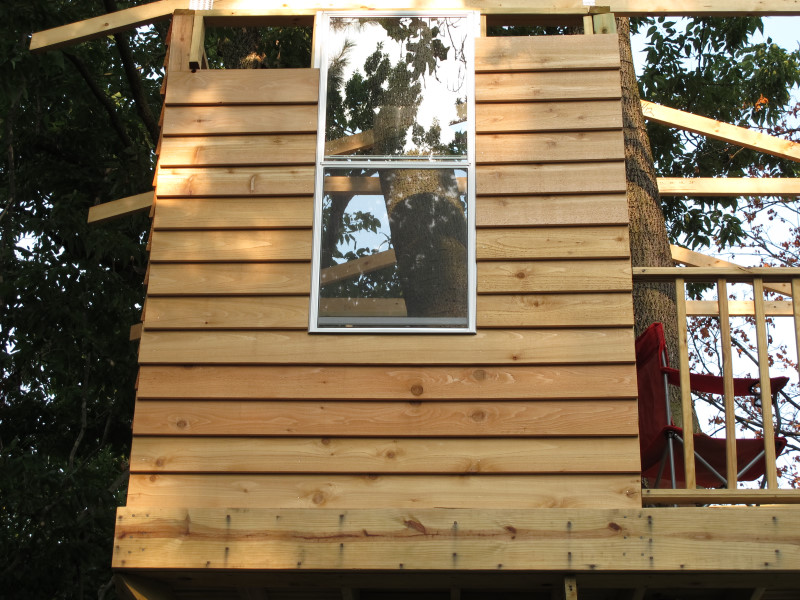
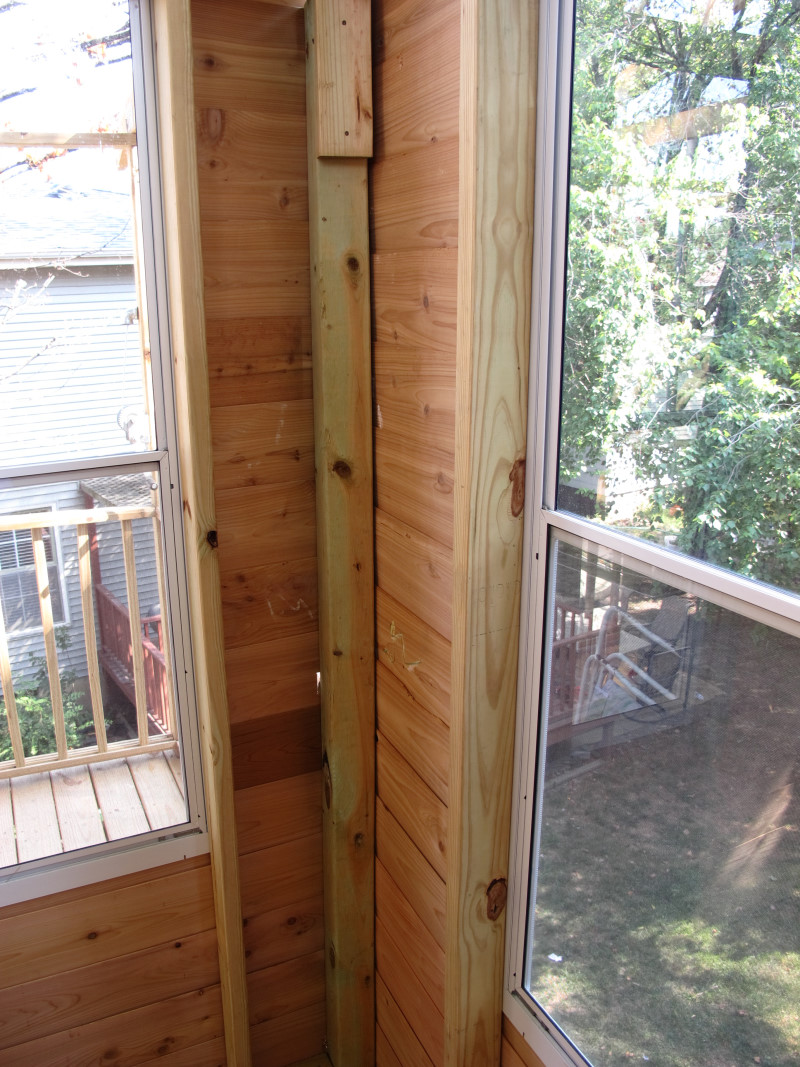
There is a wall (framed out) between where the tree splits into two parts.
Soon there will be cedar beveled siding covering where Ranae's face is (as well as the other 3 walls of the enclosed portion).
After the siding gets put on, then one final task remains (and it may be the most challenging): the roof!
Daddy will have to figure out some things as he goes along since it will be quite unique in 2 ways:
(1) Working around the trunks and (2) Working with a roof that will not be as strong as a regular house roof.
I have 3 trusses where 5 or 6 would be required for a real house.
It should be strong enough to shed water, snow, branches, but not me walking on it (at least not between trusses).
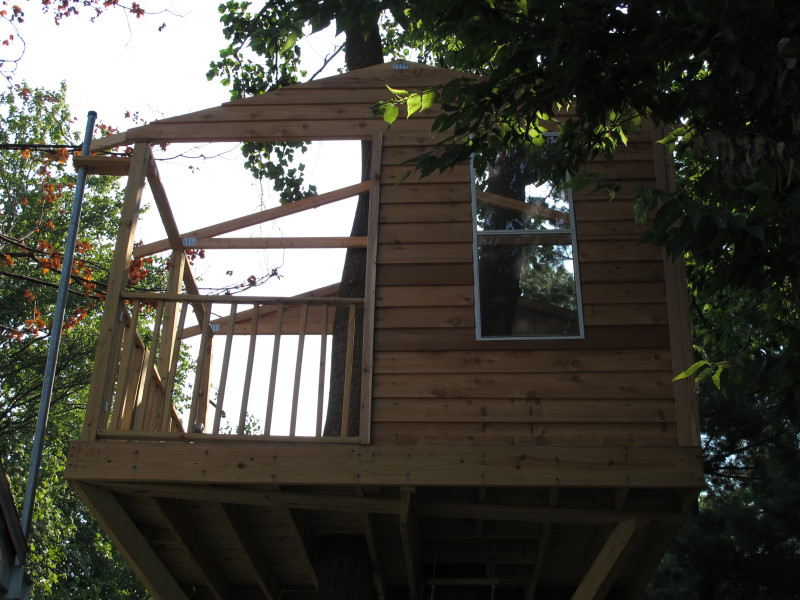
After getting back from the State Fair, Daddy worked some on the siding. It's only partially done now.
A view of the southeast corner.
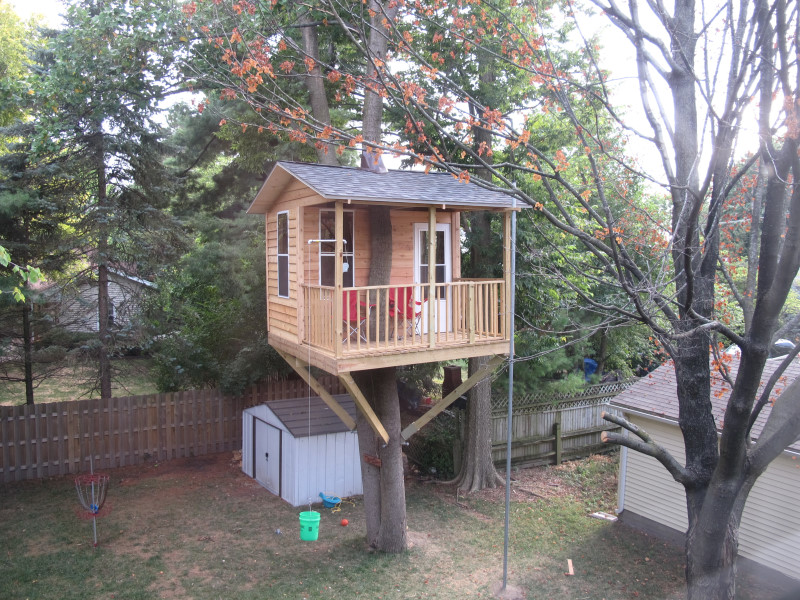
SEPTEMBER 2011
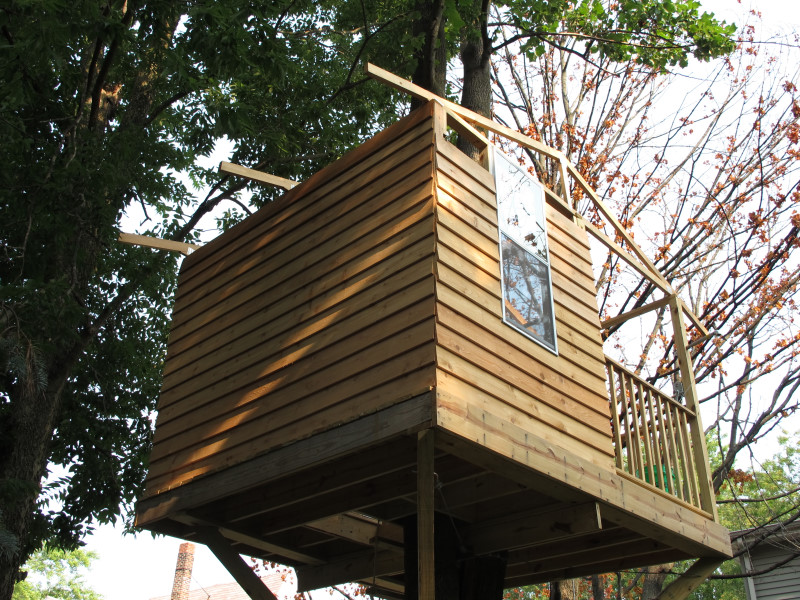
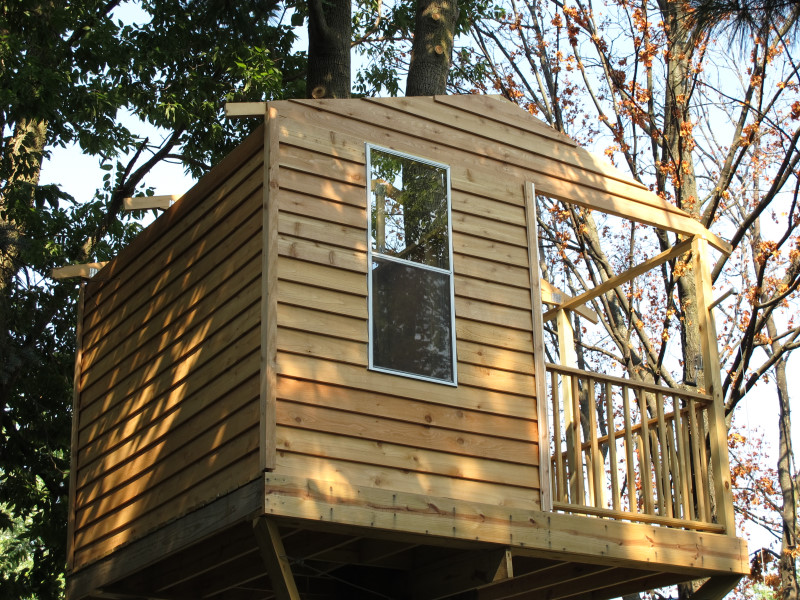
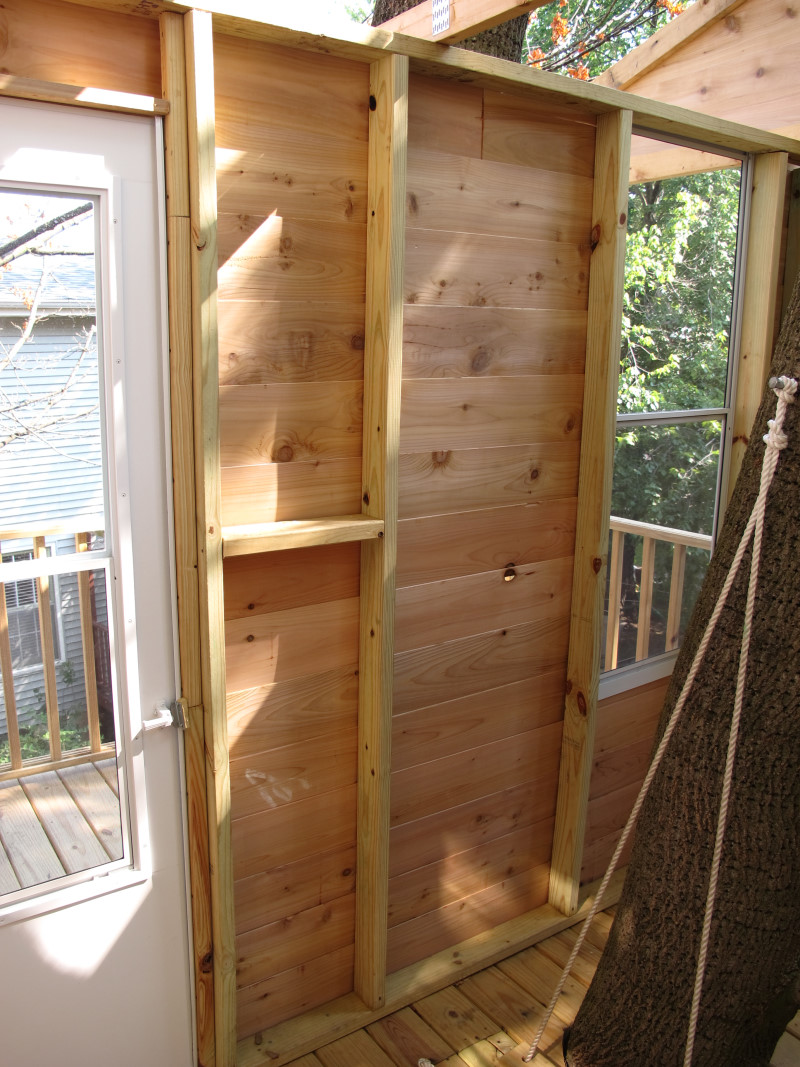
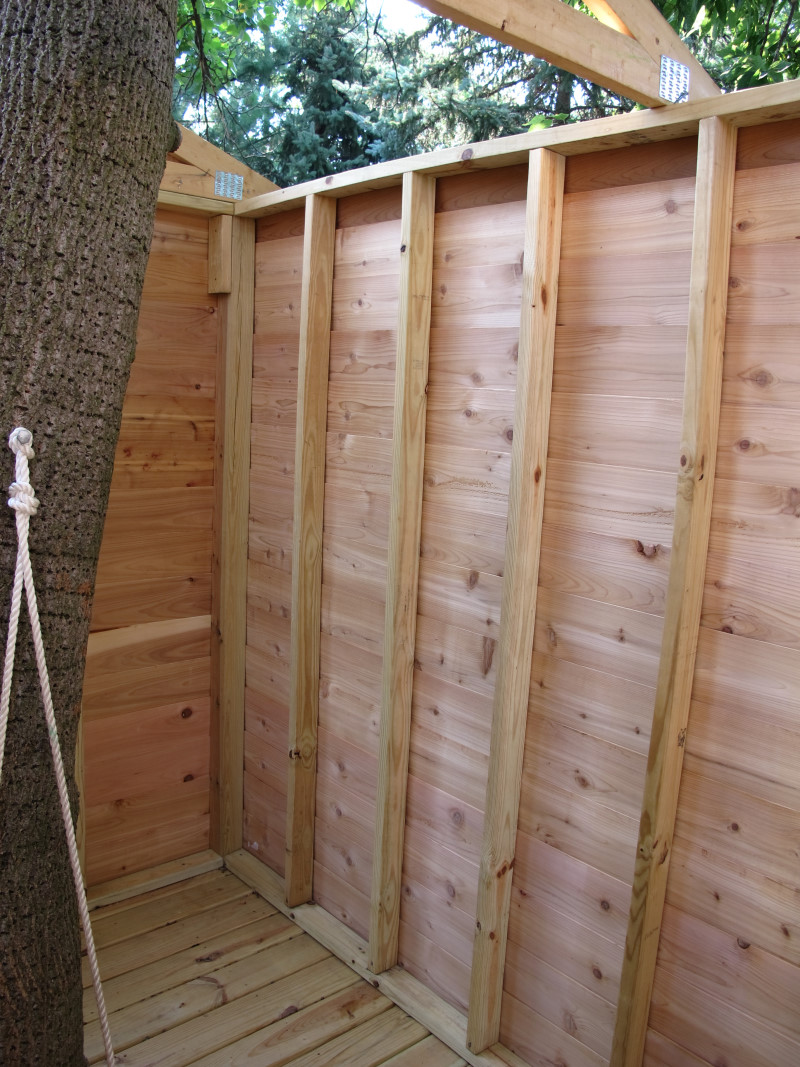
The siding is now complete as of 09/01/11. I finished putting on the last couple trim boards this morning.
I've got a solution figured out that should allow me to shingle about 80 - 90% of the treehouse from inside it.
Below are 10 shots of the treehouse with everything done except the roof:
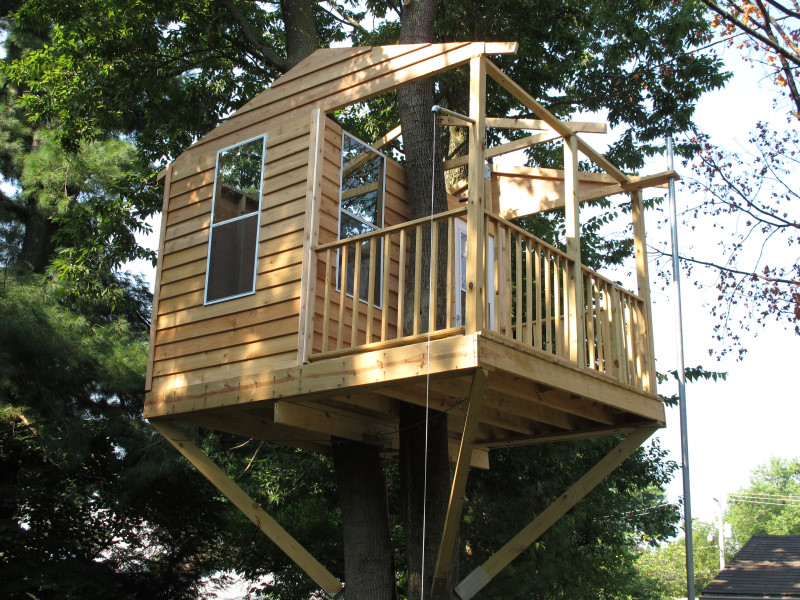
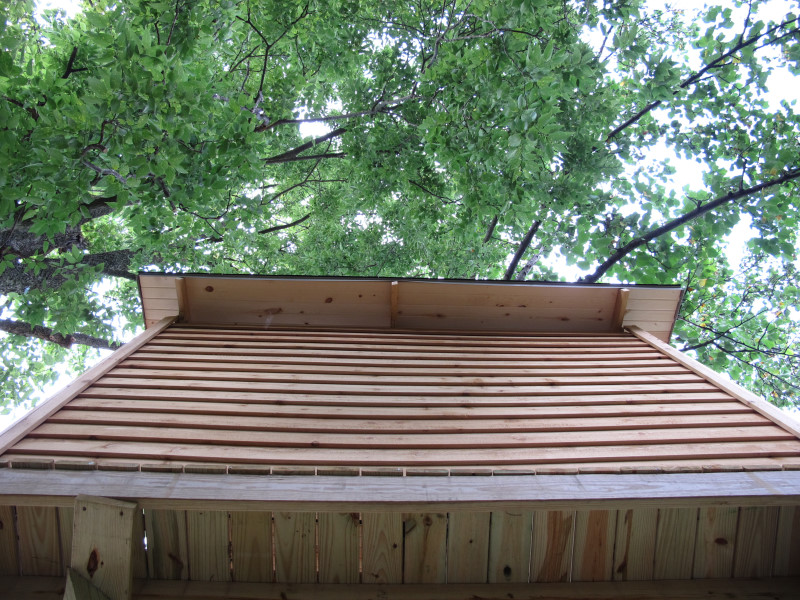
During the first 10 days of September, Daddy completed the roof.
Carsiding (tongue & groove boards) was used along with architectural shingles that match the house.
Here are 4 shots of the underside of the roof from each side on the ground:


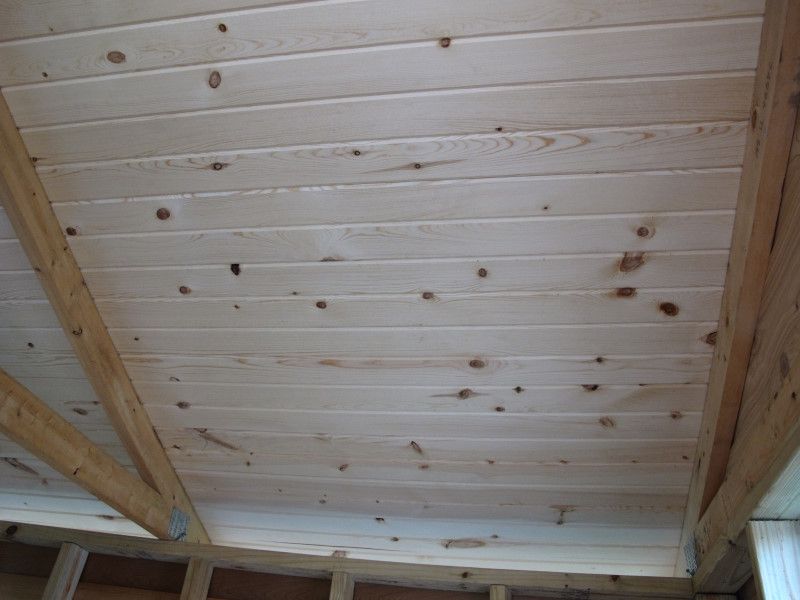
Here is a close-up shot of the carsiding from inside the treehouse.
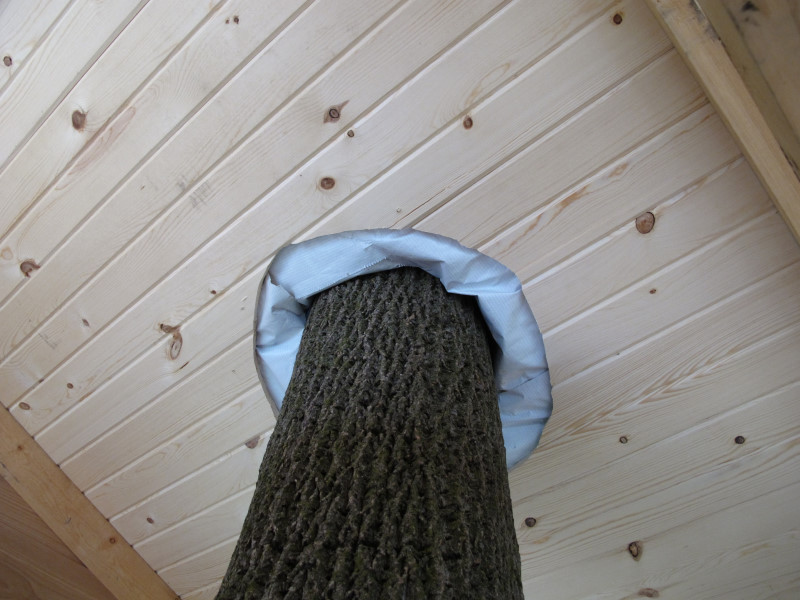
On the treehouse floor, only about 1" of space was left around trees on the floorboards.
The floor cut-outs can be made larger in the future quite easily as the tree expands.
However, such is not the case with the roof. I left 4" of space all the way around the trees with the carsiding.
I used leftover sythetic felt under the shingles and tacked it to the trees for the first layer of water protection.
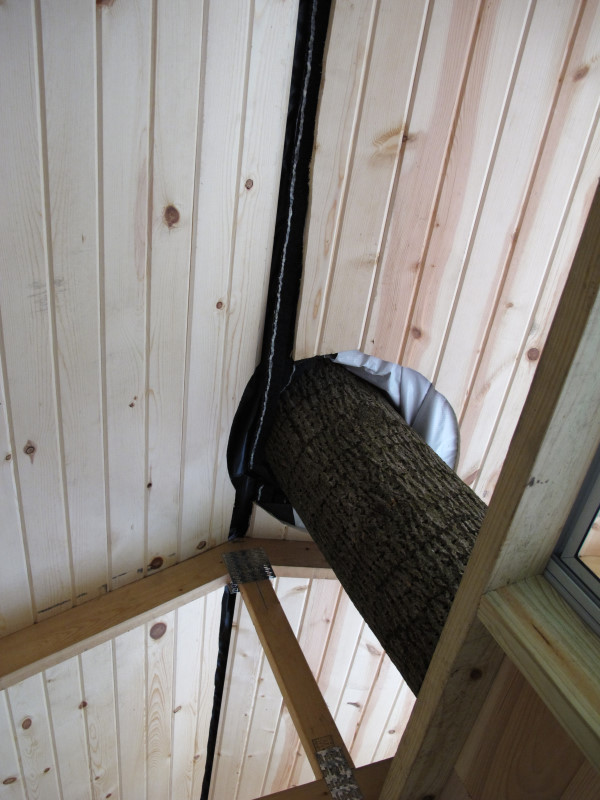
The trunk that went through the middle of the house was trickier to roof around.
I cut a 2" rectangular hole in the carsiding roof (it didn't fit flush anyway where the sides met at the top) for a ridge vent.
There are 2 shots below taken from a 2nd story bedroom window.
I wanted you to see how the shingles turned out (since you can't see them from the ground)!
I ended up wrapping aluminum around the tree trunks above the roof to try to shed water around the 4" gaps in the carsiding.
I believe some water (a minimal amount) will still get in (by running down the trunk), but that's OK.
I wanted to buy some roof rubber instead of aluminum, but I only needed about 10 square feet and the smallest quantity they sell is 200 sq. ft. for $100!
The aluminum ($10) will get the job done.
A shot from the neighbor's back yard.
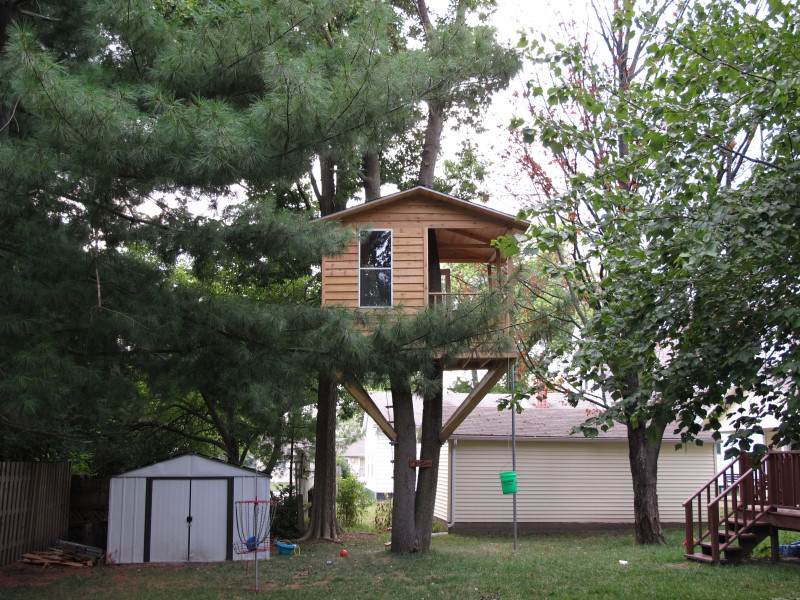
This picture shows the transformation!
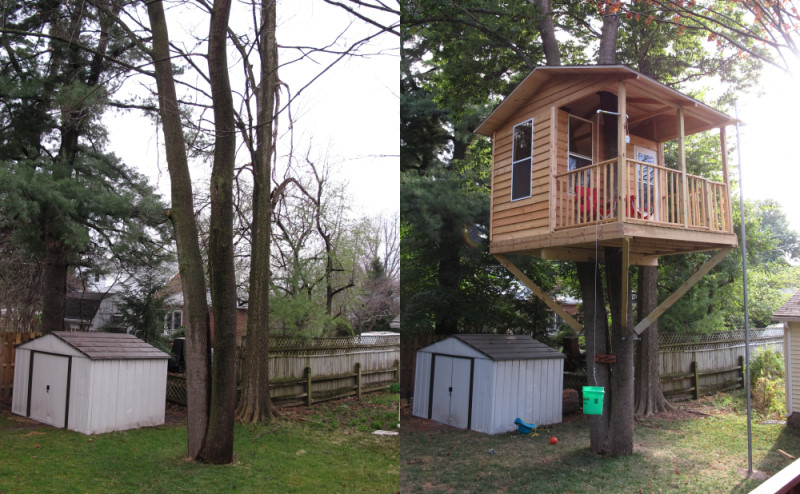
TOTAL COST: Approx. $2800
The treehouse is essentially finished now. Yes, I still need to sand the pole to make it smoother and I'd like to get a coat of sealer on the wood
and Grandpa (a retired electrician) has expressed interest in putting up some lights in the treehouse.
I've got an idea or two about some furniture that folds into the walls (table & chairs) to maximize the space.
I may include some pics of those items in the future along with some video. But, for now we're just going to enjoy it!
The boys have been begging to camp out in the tree. I guess it's time to do that!